Showing posts with label Photography Tips and Talk. Show all posts

Monday, March 15, 2010

How to Create Your Own Panoramic Photo

Throughout my limited travels, I often take lots of nice scenic photos that eventually end up in the digital storage. From time to time, I look through them, wishing that I had an ultra wide angle capturing the beautiful scene in front of my eyes. Maybe it's time to invest in a fisheye lens. However, an economic solution is to create my own panoramic photo without spending a dime.

I recently read an article from Photo Life, a high quality photo magazine, on photo merging technique from its February/March issue. It highlights tips and guidelines on creating a true panoramic photo from several similar scenic shots. I tried them, and absolutely loved them. Here we go. I'm going to share what I've done and the steps I took with you. Hope you'll find them useful in your own photo creation. I used Photoshop CS4 photo editing software. You probably can achieve the same results using older version of Photoshop or other photo editing software.

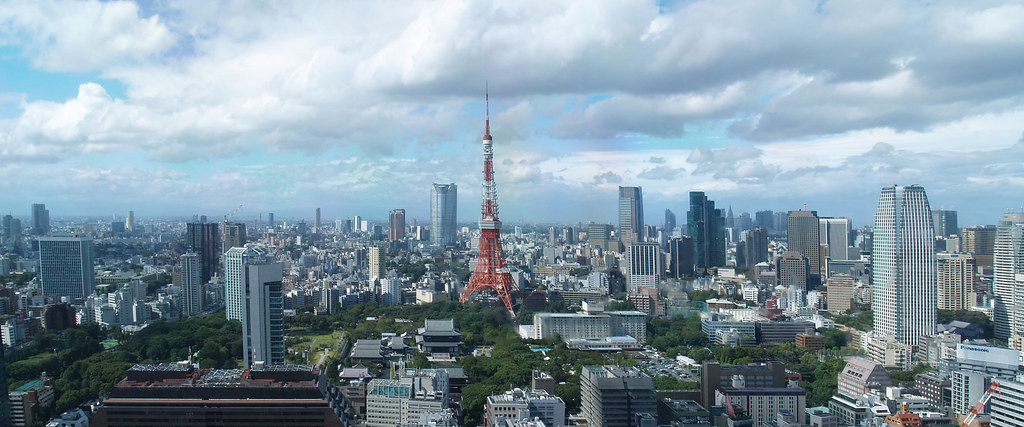
Step 1: Open all images to be merged. Browse to File > Automate > Photomerge, and click on Add Open Images. There're a few different layouts you can play with. Choose Auto for optimal results. This step may take a while to complete depending on how many images you're merging. I used the images of Tokyo Tower I took during my trip to Tokyo last year.


Step 2: Convert the resulting image to Smart Object. Browse to Layer > Smart Object > Convert to Smart Object. During this step, all the image layers generated by Photoshop are merged into one.

Step 3: Straighten object lines. Some objects in the resulting image are not exactly at the right angle due to different focal lengths used in the merging shots. To straighten them, Edit > Transform > Warp to bring up Warp tool that allows you to adjust object lines up, down, left and right. The best way to do it properly is using Grid view (View > Show > Grid) to see your horizontal and vertical lines as reference point. This step may be time consuming; however, if all your shots were taken at the same focal length on a tripod, you may not have to do much here.

Step 4: Crop image for final editing. Once you're happy with the image, you can crop it to the desired ratio. There you have it. Here's the final panoramic photo of Tokyo Tower view.
Wednesday, October 28, 2009

Olympus Stylus Tough-8000

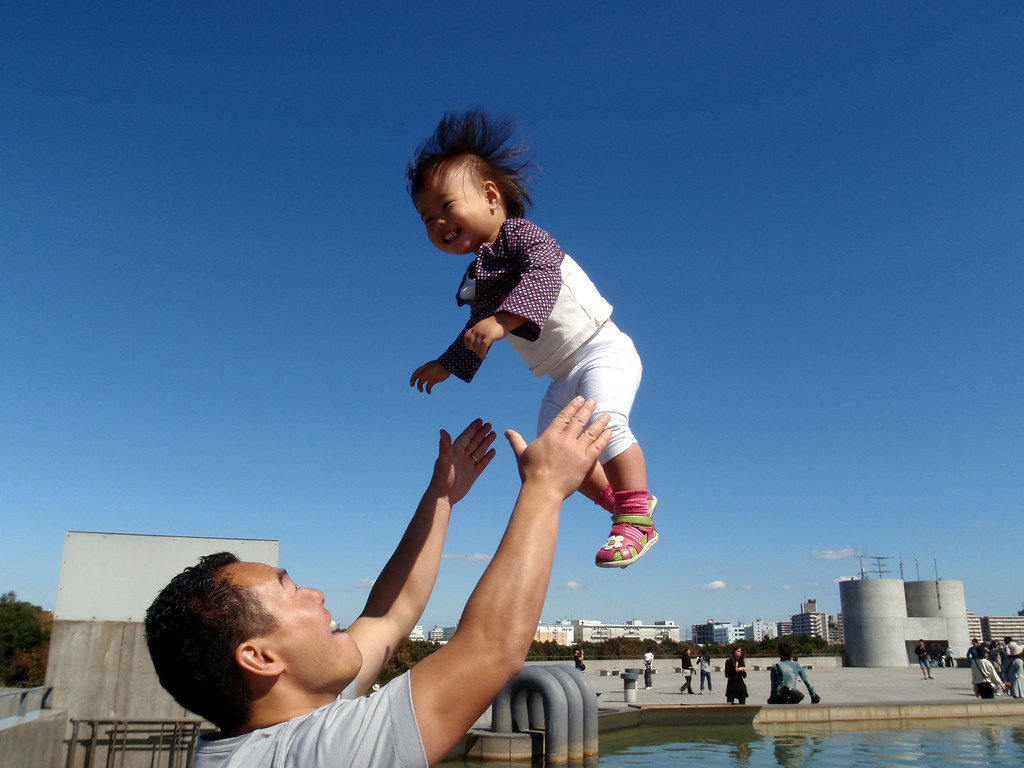
Tough-8000 is a brand new model from Olympus this year with a shockproof, waterproof, freezeproof, crushproof, and shakeproof body. I was quite impressed by the review, and got one in Akihabara, the electronic world in Tokyo. It's always convenient to have a digital camera with a smaller body. I like the fact that I can drop it, take it 10 meters under the water, or even accidentally step on it. Having a toddler who's always curious what I do with my camera, I'm not afraid to let her play with this one. I doubt she'll break Tough-8000. Best of all, it takes stunning pictures.


I'm very happy with the shutter speed of its action mode when you half-press the shutter button before the shot. With the fast shutter speed, you can capture really special moments. I took this one at Tokyo Sea Life Park when Nick was throwing Evania up in the air. They were having such a happy moment. It was so beautiful with the blue sky in the background. I just couldn't resist snapping away.

Thursday, August 09, 2007

Circular Polarizer Filter for Landscape Photos

I always look for ways to improve my photographic skills, and recently I came across Travel to the Edge with Art Wolf. It's an excellent site for travel photographers at all levels. I spent hours on it just going through the tips and techniques section. There's so much information to absorb. I felt like a little girl in a candy store :p.

One of the tips from Art is to use circular polarizer filter when taking landscape shots on a sunny day. Here are two photos I took of post Gay Pride Parade party at English Bay last Sunday. One was taken with filter, and one without filter.


Why circular polarizer filter and when? Basically, circular polarizer filter blocks certain amount of light coming from the sun, darkens the blue sky and creates a contrast in your photo. In the second photo, the blue sky appears to be light blue, and the white clouds do not pop out catching your eyes. However, you can see a striking contrast between the blue sky and the white clouds in the first photo. To maximize the effect, use the filter on a bright sunny day when the sun is high in the sky.

Where to buy and how much? Most electronic stores do not carry accessories such as filters. You can find them at camera specialty stores. Here in Vancouver, Lens and Shutter carry a variety of filters. A good circular polarizer filter normally costs around $50. I also looked around online like CameraWorld.com; however, the ones they carry are quite average. I'd rather spend a bit more on a quality filter that will go a long way.

Tuesday, May 15, 2007

Tips for Shooting Better Action Photos

I recently contributed an article to Brave New Traveler on tips for shooting better action photos. It's a brief guideline I use when taking action shots. Be sure to check it out as you may find some of the tips come in handy at the urgent moment.

Friday, May 04, 2007

How to Buy a Digital Camera

My brother has been shopping for a digital camera for a while and still hasn't bought one yet. I asked him what type of digital camera he's looking for. "Well...a quality one" he replied. Well, I guess he doesn't really know what exactly he's looking for. So, I thought this would be a good topic to talk about - how to buy a digital camera based on your own needs.

Everyone has different needs when purchasing a digital camera. You have to prioritize them before you start looking. Here's how I prioritize my own needs:

1. Budget
This is the most important step because what you want is to find the best one within a specific price range. It's always easier to compare cameras once you set the budget. You probably wouldn't get a professional digital SLR cameras just because they're better than the point-and-shoot ones, would you? Once you determine how much you are willing to spend on a camera, you'll have a basic idea of what type of cameras are affordable to you on the market.

2. Zoom
Zoom is a pivotal function in a camera, and it can make a huge difference in your photo shoot. Most digital cameras these days come with 3x optical zoom, which is equivalent to 35-105mm range. It allows you to shoot decent photos within a reasonable range. But I prefer ultra zoom, at least 10x optical equivalent to 38-380mm. With 38-380mm range, you wouldn't have to worry about getting the front seat at your favorite concerts or your kids graduation. A couple of good ones with ultra zoom on the market are Olympus SP-510 Ultra Zoom with 10x optical zoom, and Canon PowerShot S3 ISwith 12x optical zoom.

3. Image Resolution
Image resolution is defined by the number of pixels of the image. The more pixels, the higher resolution and the bigger photos can be developed. Most digital cameras come with 6 mega pixels or above. You should invest in a digital camera with higher image resolution if you want to blow up some of your amazing photos.

4. LCD and Body
Most point-and-shoot cameras are compact and small in body, and I find them hard to handle. I prefer to use the ones with a heavier body and a bigger LCD, which provide you with better grip and larger viewing area. You also shoot better images with heavier body since your hands wouldn't shake easily.

These are the basic needs I look at and how I prioritize them. I'm leaving the technical talks to the experts. It's always a good idea to read consumer product reviews, but product technical reviews done by an independent third party is more helpful. It helps you determine a few brands and models before talking to the sales person. It saves you time and energy in the whole buying process. The one I regularly reference is Imaging Resource, who provide complete full reviews on all models by all manufacturers.

Thursday, February 08, 2007

Waiting for the Sunset


This photo was taken at the Racha Resort where Nick and I spent our honeymoon. We were just enjoying the sunset while most visitors had gone back to their villas to get ready for dinner. I thought that was the most beautiful time of the day. It's not that I don't enjoy blue sky with sunshine, I just love sunset more. No words can describe the intense fiery colors at sunset. So I'd rather snap it with my camera and remember it forever.

Wednesday, February 07, 2007

ADIDAP - All Day I Dream About Photography

One of my passion is photography, and when I came across a good photography site, I like to share it with my readers. ADIDAP - All Day I Dream About Photography is a good place to get photography ideas, tips and resources. Techniques such as selective color effect in black and white photos and transforming an image to a painting are commonly adopted by professional photographers, and they do wonders to your photographs. Antoine Khater, the author of ADIDAP, provided step-by-step tutorials on how to add those effects to your photos using Photoshop. Give them a try and see how you like them.

Sunday, December 10, 2006

Love is in the Air

I'm not very good at people shots because I think it's the hardest thing to do. It's difficult to capture people in their most natural and unpretentious state. However, I thought this one did a decent job of presenting a moment of two people in love and mostly unaware of the photographer. Right before the sunset, most tourists have gone back to their lodges. Nick spotted this cute Thai couple on the beach. Based on their body language, we could tell love was the air. I immediately took out the camera and snapped away from the distance.

Friday, December 08, 2006

A Day at Karon Beach, Phuket, Thailand

Just another day of sun tanning at Karon Beach, Phuket. I couldn't help taking a few shots while Nick was in the water. It was taken from the distance with an interchangeable Zuiko Digital 40-150mm f3.5-4.5 lens. I used sports mode, which allowed me to shoot at a fast shutter speed without blur. This is one of my favorite.

Tuesday, November 28, 2006

How to Shoot Perfect Sunset Pictures with Digital SLR

Sunset is the most beautiful time of the day. However, sometimes your sunset pictures don't turn out as expected. There are techniques you can improve while shooting sunset scenary using a digital SLR camera. I found some targeting users. However, the techniques apply to all digital SLR camera users. You should practice these techniques before going to your travel destination. You will see huge improvement on your scenic shots. Of course, patience and luck come in play sometimes.


I shot this one by an unknown beach in , Thailand. Nick and I were on a scooter ride around the island on our last day in , and stumbled upon this secluded lovely beach. It was a couple of hours before sunset. We decided to stay for the sunset. We climbed to the highest point of the surrounding rocks and waited for the perfect timing. And this is what I got after 7 or 8 shots. I love this shot because it highlights the dramatic colors of the sky. And the small island in the middle of the sea makes the composition quite interesting. It was shot in mannual mode, at f/3.5, 1/150th of a second.

Friday, November 17, 2006

Being an Amature Photographer

Sometimes, I think I might have been a photographer if I never made it to the programming world. I just love travelling and taking shots of just about anything. I used an with a 14-45mm wide zoom lens and a 40-150mm telephoto lens for our honeymoon photos. I'm still new to using SLR cameras, but thanks to the beautiful scenery in Thailand. Some photos are amazing, left us with unforgettable memories of our trip.